When you encounter problems with the flame in your gas oven, it can be a source of frustration and concern. In this comprehensive guide, we will explore the common causes of gas oven flame problems and provide step-by-step solutions to help you diagnose and resolve these issues.
Common Causes of Gas Oven Flame Problems
Understanding the underlying causes of gas oven flame problems is essential for effective troubleshooting and repair. Here, we’ll delve deeper into these common issues and provide insights on how to address them:
1. Gas Supply Issues
Gas supply issues can disrupt the consistent flow of gas to your oven, resulting in a variety of flame irregularities. These problems can manifest as uneven flames, delayed ignition, or, in more severe cases, a complete failure of the flame.
Symptoms:
- Uneven Flames: When the flames in your oven appear uneven, with some areas burning more intensely than others, it’s a clear sign of gas supply issues.
- Delayed Ignition: A noticeable delay between turning on the oven and the ignition of the flame is an indication that the gas supply isn’t as consistent as it should be.
- Complete Flame Failure: If you smell gas but see no visible flame, it’s a critical safety concern. In such cases, do not attempt to relight the oven and immediately shut off the gas supply.
Diagnosis:
- Start by inspecting the gas supply line and the gas valve for visible damage or obstructions. Ensure that the gas shutoff valve is fully open to allow for the smooth flow of gas to the oven.
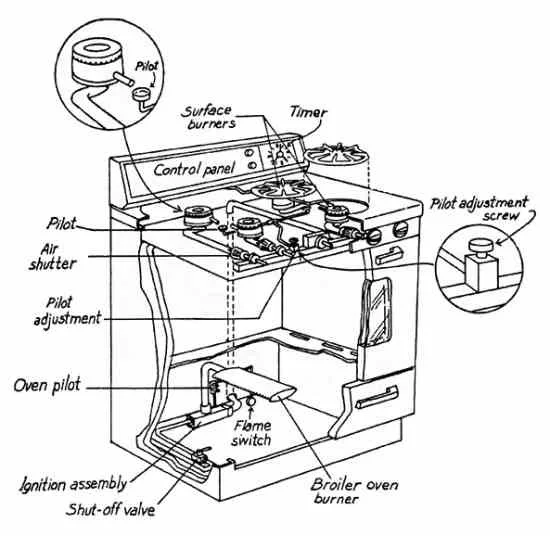
2. Pilot Light and Ignition Problems
The pilot light and ignition system are crucial for initiating and sustaining the flame in your gas oven. Issues with these components can lead to ignition problems, erratic flame patterns, or even complete flame failure.
Symptoms:
- Delayed Ignition: When the pilot light takes an unusually long time to ignite the main burner, this is a clear indication of a problem.
- Irregular Flame Patterns: If the flames flicker or burn unevenly, it may suggest issues with the pilot light or ignition system.
- Complete Flame Failure: When you turn on the oven and there’s no flame, despite the gas being supplied, it’s a significant issue that requires immediate attention.
Diagnosis:
- Examine the pilot light to ensure it is consistently lit. For ovens with electronic ignition systems, check the igniter for proper functionality.
3. Burner and Gas Tube Obstructions
Blockages within the burner and gas tubes can significantly disrupt the flow of gas and consequently affect the quality and performance of the oven’s flame. Identifying and safely clearing these obstructions is vital for restoring optimal oven function.
Symptoms:
- Irregular Flames: If you observe flames that burn unevenly, flicker erratically, or vary in intensity, it could be a sign of blockages in the burner or gas tubes.
- Delayed Ignition: Blockages can also lead to delayed ignition, which further contributes to inconsistent flame patterns.
- Complete Flame Failure: In severe cases, blockages can cause a complete failure of the flame, leading to an unlit oven.
Diagnosis:
- Carefully inspect the burner and gas tubes for any visible obstructions. These obstructions may include dirt, debris, or even food particles.
By comprehending and addressing these common causes of gas oven flame problems, you can take the necessary steps to troubleshoot and resolve the issues effectively. Nonetheless, it’s vital to keep safety as the foremost priority, and for complex gas-related problems, seeking professional assistance is highly recommended.
DIY Troubleshooting and Solutions
When it comes to resolving gas oven flame problems, many issues can be tackled with simple do-it-yourself (DIY) solutions. Below, we’ll walk you through these DIY troubleshooting steps and provide clear instructions to help you get your gas oven back to its optimal performance.
Cleaning the Pilot Light and Ignition System
The pilot light and ignition system are key components responsible for starting and maintaining the flame in your gas oven. Keeping these components clean and well-maintained is crucial to ensure reliable ignition and a steady, even flame.
Step 1: Turn Off the Oven: Safety should always be a priority when performing maintenance. Start by ensuring that your gas oven is turned off and not in use.
Step 2: Locate the Pilot Light: Locate the pilot light in your oven. It’s usually a small, continuously burning flame located near the burner. Take a moment to familiarize yourself with its location.
Step 3: Extinguish the Pilot Light: Carefully use a long, thin tool, such as a fireplace matchstick or a barbecue lighter, to extinguish the pilot light. Be patient and allow it to cool down before proceeding to clean it.
Step 4: Clean the Pilot Light: Once the pilot light has cooled, it’s time to clean it. Gently clean the pilot light using a soft brush, such as a small paintbrush. This will help remove any dust, dirt, or debris that may have accumulated over time.
Step 5: Relight the Pilot Light: After cleaning, use a long lighter or a match to relight the pilot light. Ensure that it ignites and stays lit consistently. The pilot light should now burn steadily and brightly.
Step 6: Observe the Flame: Watch the pilot light flame to ensure it burns steadily and evenly. A well-maintained pilot light is crucial for consistent oven ignition. If it appears to be burning steadily, you’ve successfully cleaned and maintained this essential component.
Clearing Burner and Gas Tube Blockages
Blockages in the burner and gas tubes can disrupt the flow of gas and affect the quality and performance of the oven’s flame. Safely clearing these obstructions is essential for restoring proper gas flow and an even flame.
Step 1: Turn Off the Gas Supply: Safety is paramount when working with gas appliances. Ensure that the gas supply to your oven is turned off before attempting any maintenance.
Step 2: Locate the Burner and Gas Tubes: Identify the burner and the gas tubes in your oven. The burner is typically located at the bottom of the oven, and the gas tubes run from the gas source to the burner. Familiarize yourself with these components.
Step 3: Inspect for Blockages: Carefully inspect the burner and gas tubes for visible obstructions. Look for any dirt, debris, or food particles that may be obstructing the proper flow of gas.
Step 4: Remove Obstructions: Using a soft brush or a cloth, gently remove any obstructions you find in the burner and gas tubes. Be cautious not to damage any components while doing this. Thoroughly clearing these blockages is essential for ensuring a consistent flame.
Step 5: Reassemble and Turn On: Once you’ve cleared the blockages, reassemble any components you may have removed. Turn the gas supply back on, and test your oven to ensure the flame burns evenly and consistently. If you’ve successfully cleared the blockages, you should see a noticeable improvement in flame quality.
Adjusting the Gas Flow
In some cases, issues with flickering or uneven flames can be resolved by adjusting the gas flow to achieve a consistent and even flame. Here are the steps:
Step 1: Locate the Gas Control Knob: Find the gas control knob on your oven. It’s typically located near the oven’s burner. Familiarize yourself with its location.
Step 2: Turn Off the Oven: Before making any adjustments, ensure the oven is turned off and not in use. Safety should always come first.
Step 3: Adjust the Gas Flow: Carefully turn the gas control knob slightly to adjust the gas flow. Experiment with small adjustments until you achieve a steady and even flame. Take your time with this step to find the right balance.
Step 4: Observe the Flame: With the gas flow adjusted, turn on the oven and observe the flame. It should now burn consistently and without flickering or unevenness. You can fine-tune the gas flow until you achieve the desired flame quality.
These DIY troubleshooting and maintenance steps can often resolve common gas oven flame problems and ensure the continued efficiency and safety of your gas oven. However, for more complex issues or if you’re uncomfortable performing these tasks, it’s advisable to seek professional assistance to ensure the optimal performance and longevity of your gas oven.